A little journal of my adventures in gardening, cooking and other constructive projects.

Sunday, November 27, 2011

Catching up: Broccoli

As part of my catching-up on the past six months, I present to you...


Broccoli

After a slow start, the broccoli turned out extremely well!  Five of my six plants yielded a nicely sized head of broccoli, and of course, continued to produce side shoots after the main head was cut.

At the end of this post is a little recipe for Broccoli Au Gratin, based on this one.  Click here to jump directly to my recipe.

Quick Recap:  Started broccoli seeds indoors, moved them outside; when I planted them in the raised bed, they were eaten.  I though the culprits were rabbits, so when I put in six new plants, I also put a plastic collar around them.  The next day, the plants were still nibbled, about 2 inches below the top of the collars.  So the culprits were in fact birds.  Not having enough seedlings left, I replaced only five of the plants, this time putting up a net over top of the bed.  As the plants grew, I increased the height of the net.

After the plants were large enough, the birds stopped nibbling on them; though rabbits would occasionally snack on the outer leaves; and some kind of insect would nibble small holes.  But if I sprinkled torn up basil leaves, I wouldn't get any new nibble holes.

Here are a few shots of my harvests:


This size was typical for my broccoli:  (5 August)


After cutting the main head, side shoots formed (7 Aug)!  I had enough to harvest maybe once every two weeks.


Side shoots kept on coming through til November.  This photo was taken 29 Oct:


In early October, sometimes florets began spreading too far apart and blossoming quickly.  I had originally intended to save these and pick the flowers off to decorate my baking (maybe atop a cake or muffin or even bread); but didn't have time to bake too often.  Photo: 22 Oct.


This was taken on 9 Oct:


The broccoli held up surprisingly well against the light frost, and even the hard frost!  I am very impressed.  Unfortunately, due to laziness (I didn't want to put on a coat and boots to go outside for only a few seconds), I did not get any good photos of the broccoli before it began wilting.

Here they are on 20 Nov (-13C average temp that day).  Apologies for the low quality, I was using my cell phone camera:


As you can see, the leaves are wilting, but not nearly as much as other annuals!

Here is the one broccoli plant who had been harassed by birds early on and had not been replaced by a stronger plant.  As you can see, he didn't get big enough to harvest the main head.


For whatever reason, I don't want to pull them out of the garden.  This past week, it got up to +9C (Thu 24 Nov), and I swore I was going to pull them out of the garden (and finish all my other gardening chores).  But they just fill me with pride and hope.  ...  I think I'm partly in denial that Winter is actually coming to stay (though now that it's gotten down to -14, I'm starting to be convinced).

I still think that I'll harvest the small broccoli leaves to put in either a soup (or noodles!) or a stir-fry.  But I think it may be too late now!


After all this, I have to say I'm extremely impressed with the broccoli.  It was completely unaffected by powdery mildew, even though everything else caught it.  It was a slow start--will have to protect against birds right from the start next time--but they were just so sweet and crisp and fresh!

I certainly wasn't one of those kids who pouted and crinkled her nose at the prospect of having to eat, ew, broccoli for dinner.  But it always seemed mediocre to me--a boring vegetable when it came to flavour.  Sure, it looks neat and when it soaks up sauce from a stir fry, but is still firm enough to crunch a little when you bite down and get that explosion of sauce, mmm!  But I just wouldn't eat plain broccoli.  Until I had these sweeties.  I never knew broccoli could be sweet!

Also?  With a bechamel sauce, they make quite a fine dish!
  

Broccoli Au Gratin - Recipe
adapted from this recipe

Hardware
  • baking dish just large enough to fit broccoli (err on the side of too small rather than too large); buttered
  • pot large enough to blanch broccoli
  • medium mixing bowl

Ingredients 
  • broccoli, 1 head
  • bechamel sauce (see below)
  • panko crumbs, about 1/2 cup
  • olive oil, about 1 Tbsp
  • basil, parsley, about 1 teaspoon
  • salt, about 1 teaspoon
  • black pepper, to taste
Bechamel Sauce
  • butter, 2 Tbsp
  • flour, 2 Tbsp
  • milk, 1 cup
  • Swiss cheese, 1 cup grated
  • nutmeg, pinch
  • bay leaf, 1
Wash broccoli.  Prepare a pot of water with a little baking soda dissolved (to intensify the broccoli's colour).  Meanwhile, cut broccoli into florets, as uniformly as possible (2-3 inches worked well for my dish).  Blanch florets 30 seconds to 1 minute or until just fork tender.  Alternatively, microwave the florets for one minute on high, without extra water (water from washing should be enough to steam).

Drain broccoli and set aside.

Prepare bechamel sauce:  

Melt the butter in a small saucepan and stir in the flour. Cook on low heat stirring for several minutes, or until the roux just starts to brown. Whisk in the milk gradually to form a smooth sauce.  Add bay leaf.  Warm until just simmering.

Remove the sauce from the heat, remove bay leaf and gradually stir in the cheese, the pepper and the nutmeg.


Preheat oven to 350F.
Arrange broccoli florets upright in a buttered baking dish.  Pour sauce over.  I personally have the sauce not uniformly spread; leaving some florets uncovered so my diners can taste the vegetable without sauce, for contrast.

Bake for 15 minutes, just to bring up to heat.  Meanwhile, make crumb topping:  In medium bowl, combine panko crumbs, olive oil, salt and herbs until just moistened.

Carefully remove dish from oven.  Top with crumb mixture followed by freshly cracked pepper.  Return to oven.  Bake (or broil) for another 10-15 minutes or until crust is golden brown.

Serve warm!


Catching up: Tomatoes

As part of my catching-up on the past six months, I present to you...

Tomatoes

My tomato plants did exceedingly well this year!  Just as a reminder, I planted:
  • 4x Stupice Tomatoes (in photo: larger red tomato)
  • 2x Sweet Cherry Hybrid (oblong orangey cherry tomatoes)
  • 2x Sunsugar (small yellow cherry tomatoes)
Everyone was extremely impressed by the extremely sweet Sunsugars.  A friend of mine said she couldn't eat store-bought tomatoes anymore thanks to these!  

The Hybrids were...good.  I'm sure if I hadn't grown Sunsugars, I would be impressed; but because I did, I found them to be...mediocre; sweet, yes, but just not extraordinary.  

Similarly, I was not impressed by the Stupice tomatoes.  I should have read the label more carefully when it described the size of the fruits.  Their flavour was bland, their texture was unremarkable and everything about them was...  underwhelming.  Especially their size.  I don't think I will plant this again next year.

One Stupice plant produced oblong fruits, reminding me of Roma tomatoes:


The hybrid kind of scared me with how many fruits it would put out on a single vine.  It seemed so unnatural:  


I absolutely loved the colour of the Sunsugars.  Here, they're not quite ripe yet; they turn a luscious golden yellow-orange when ready; and if you leave them on the vine even a day longer, the colour deepens and intensifies--as does the flavour!  

I always preferred to err on the side of "over-ripe" than under-ripe, but found it so hard to resist--even under ripe tomatoes were sweet and juicy!    


I'll post more on end-of-season cleanup later, but I just have to mention: by the time heavy frost came, some of these plants were over eight feet tall--even with a secondary main stem!  


After my plants got over 5 ft tall, I stopped cutting off side-shoots/suckers.  The fruits would be too tall for me to harvest comfortably after that.  

I think next year, I should snip the main stem at 5 ft, and let one secondary stem grow.  This year, I let too many side shoots grow, which greatly slowed fruit production.  

I found these tomatoes to tolerate a light frost (-1 C), surprisingly.  After the first few light frosts, I feared they wouldn't survive much longer, and so cleared the two hybrid cherry tomatoes.  (By this time, I had already cleared away the squashes).  

But the Sunsugar and Stupice tomatoes still kept going through early October!  


Here are some tomatoes from 9 Oct.  Gardening slowed down with schoolwork, and my mom took over most of the work, harvesting every second or third day.  

I want to title these photos: "Forbidden Fruit" because the Stupice looks just so temptingly, yet so banefully red; and the Sunsugars, though very ripe and deep orange, look kind of sad in the dimming light, and with the chicken wire, seem almost to be imprisoned.  Or maybe not--you tell me.  


In mid-October (I think the 18th), a hard frost hit (-5 C and below), which stayed a few days, and I didn't get home from school early enough to cover the tomatoes before it was too dark to see.  Here they are a little later (22 Oct) when I had time to frolic work in the garden again:  


All in all, I was extremely satisfied with these tomatoes.  I will definitely plant Sunsugar again!  

Next year, I will plant larger tomatoes (larger than Stupice *grumble, grumble*), and have my eyes set on Black Krim or Purple Cherokees.  


Saturday, November 26, 2011

Catching up: Squashes

Sorry for the long absence.  Some things happened at work, and that kept me busy for the later half of summer, and then I fell out of the habit of blogging.  I did however keep taking photos, and I'm considering switching over to Facebook, which has a slightly more convenient interface.  We'll see about that.

I decided that I ought to fill in the blanks and continue this blog, adding my culinary adventures while gardening takes a break over Winter.  I thought about updating chronologically, but I think there's just too much context for me to blog as if I were in the moment; so I will choose particular parts of the garden and show how they changed since July.  (Wow, that was half a year ago...!)

First, I'll start with my Squashes:


The pumpkin and butternut vines sprawled all over the lawn by early August.  Personally, I was quite happy with this!  My folks, however, bemoaned the lack of sunlight to their precious, precious lawn.


The two closest plants are zucchini; the yellowing vines come from the butternut, and the greener ones farther back (and also climbing the trellis!) are from the sugar pumpkin.


Pumpkins

Because of work, I had less time to garden; and the entire squash patch (two zucchini plants, one sugar pumpkin and one butternut plant) got hit hard by powdery mildew.

Actually, I heard that because of the strange weather we had, everyone got hit by powdery mildew--even weeds growing on the side of the roads.  So I don't feel quite so bad!

Photo to left:  Pumpkin leaves dusted white by powdery mildew.  Toward bottom of photo, yellow-er leaves of butternut plant mostly unaffected!

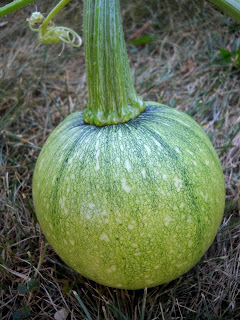
Over the entire season, I got seven fruits to set; two of which hung mid-air when the vines climbed up my neglected trellis monstrosity.  Here are some photos of the fruits, green and new in early August:  


Here are some photos of the pumpkins beginning to turn orange.  I think they're absolutely gorgeous here.


Here they are, nearly ready in late August:  


By early September, I had cut most of the fruit, lest the powdery mildew affect its taste/texture too much.  This photo was taken on 4 Sep:


Above: three of my seven homegrown pumpkins (and an orange buttercup squash purchased from a farmers' market).  Except for one, they all turned out this size, about 8-10 inches in diameter.

Of those, I gave one to Myro's aunt (Myro thought it might be nice if her young daughter could have some traditional pumpkin porridge); made soup from one, and baked the rest for my mom.  She's diabetic, and got it in her head that pumpkins are great for people with diabetes.

The last pumpkin finished just larger than the size of my fist!


I baked a banana bread inside it and gave it to a friend.  Come to think of it, I never did find out if it worked out or not!


I believe the last pumpkin (this small one) was harvested just before 13 Sep.


Zucchini

Left:  This photo was taken on 7 August, while the plants were still mostly healthy.

The two zucchini plants got hit the hardest by powdery mildew (PM).  Though maybe it was a tie with the pumpkin, since the pumpkin plant was just so extensive.

I had tried using Green Earth Garden Fungicide, but since my patch grown so big, I would need a quarter bottle to spray the entire patch; and at ten bucks a litre (even seven bucks a litre on sale), this would be too expensive for me.

A quick Google search showed me chamomile tea, garlic and tea tree oil were good mostly-common antifungal treatments I could apply in spray form.  I ended up making a strong chamomile-garlic tea with a few drops of tea tree oil.  I just had to make sure I didn't spray within a day of harvesting fruit.


This spray only kept the PM from spreading quickly, it did not kill it.  And when I got busy with work, the PM took over and slowly killed everything.

An additional problem that was brought up in an earlier post: red ants.

I have no idea why, but red ants decided to take residence in my nasturtium and zucchini blossoms!  I was enraged!  I did a few silly things to try to deter them.  Once, I was so angry, I threw my hot mint tea at the plant (it killed a zucchini leaf, but not much else).

Actually, mom fell in love with the brightly coloured nasturtiums, and I pulled them out for her to pot.

What did work:  tearing up mint leaves and sprinkling them around and sometimes inside the blossoms.  However, this sometimes led to bad fruit setting--because I was putting things inside flowers, sometimes even female flowers.

I just have this aversion to red ants, I'm not sure why, but it must be mostly psychological.  I don't like them. I would settle for disfigured or aborted fruit if that meant no more red ants.

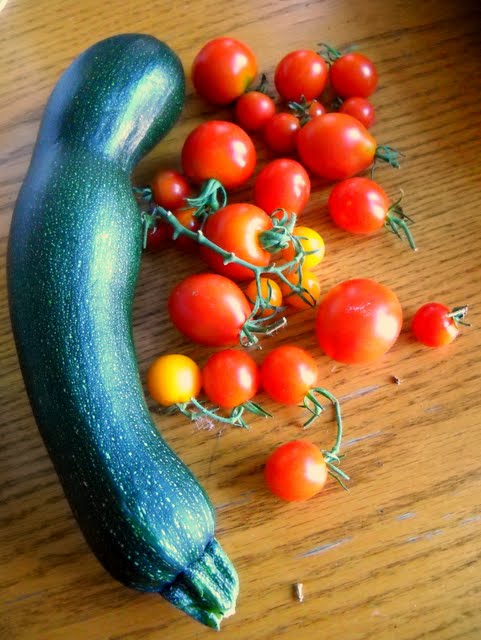
We also got a rather excitingly shaped zucchini squash.  I think there must have been some cross pollination from the butternut:


Butternut Squash

As you could tell from the earlier picture of the garden bed, the leaves on my butternut vines began yellowing starting from the oldest leaves.  A quick Google search revealed this to be (most likely) a nitrogen deficiency.

Since the pumpkin was growing like crazy, I presume the butternut was starved for nitrogen.  I worked a few scoops of blood meal into the soil and noticed a slight improvement within days.

Something interesting:  The zucchini and sugar pumpkin took a hard hit from PM.  Yet the butternut seemed mostly unaffected by PM!  It was until much later in the season that PM became a problem for the butternut.

I was able to prevent worsening of PM by spraying the leaves with a solution of warm milk and water.  I didn't measure, just eyeballed equal amounts in my spray bottle.  I applied the spray every second or third day, to the tops and bottoms leaves that had not yet been severely affected by PM.

However, while spraying the leaves, I noticed fuzzy white spots under the leaves.  I believe this may have been downy mildew.

I did get a single, lonely fruit to set!


I believe this next photo was taken after I had put blood meal into the soil.  Notice the crack.  


Then something strange happened.  Discolouration.  No softness, no open wounds.  The discolouration occurred on the side that had been facing the ground, so I gently rotated the fruit.  I was also worried that softness might later develop and attract insects, so I crumpled up a large sprig of mint and let it lay nearby.  


I ended up cutting this fruit early, because I was just so scared something bad was happening.  As it turned out, I cut it so early that seeds hadn't even formed!  Live an learn.  This was in early to mid -September and the fruit was about 10 inches long.

Myro and I roasted this squash in the oven with brown sugar and nutmeg.  It was definitely too young!!


Still to come:  Tomatoes!  Carrots!  Broccoli!  Herbs!  Compost!